Over the holiday break I made some time to work on my desk layout, something I’d been wanting to do for quite a while. I’d been wanting to “up my game,” so to speak, with regard to producing more content, including some video content. Inspired by—and heavily borrowing from—this YouTube video, I decided I wanted to create a similar arrangement for my desk. In this post, I’ll share more details on my setup.
I’ll start with the parts list, which contains links to everything I’m using in this new arrangement.
Parts List
When I shared a picture of the desk layout on Twitter, a number of folks expressed interest in the various components that I used. To make it easier for others who may be interested in replicating their own variation of this setup, here are Amazon links for all the parts I used to build this setup (these are not affiliate links):
- WALI Extra Tall Single LCD Monitor Fully Adjustable Desk Mount (qty 2)
- WALI Single Fully Adjustable Arm (qty 2)
- Pergear TH5 Camera Swivel Mini Tripod Ball Head (qty 2)
- Pergear TH3 Pro DSLR Camera Tripod Ball Head
- PULUZ Metal Handheld Adjustable 3/8” Tripod/Monopod Extension
- Camera Quick Release Screws, 3/8” and 1/4”
- Neewer 160 LED Dimmable Light Panel, 2 pack
The Setup
This photo shows the finished setup:
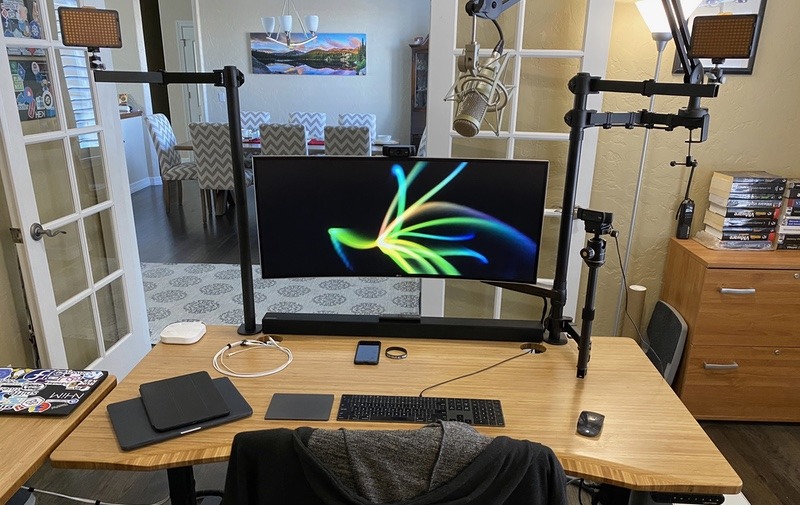
Breaking it down a bit, here’s how the parts list above is represented in this photo:
- On each side of the monitor are the extra tall desk mounts (item #1 above). From a setup/installation perspective, there’s nothing special here—these bolt onto the desk. They do offer a grommet installation method, which I didn’t use because the placement of the grommets on my desk are less than ideal.
- On the desk mount on the right of the photo are four arms. Three of these arms are #2 from the parts list above (the WALI fully adjustable arm); the last is a repurposed monitor arm from an Amazon Basics monitor arm (this one). I didn’t include the Amazon Basics monitor arm above because…well, it’s pricey when all you’re using is the arm itself and not the base. You’re probably better off using a WALI monitor arm (I re-used the Amazon Basics arm because I already had one from a previous configuration).
- The lowest arm on the right desk mount is a WALI arm (item #2 above; more on that in a moment) and is used for a camera. The next arm up is the re-used Amazon Basics arm (for my LG 34” ultrawide monitor). The third arm is used for the microphone boom, and the last arm is for the Neewer LED panel (item #7 on the list above).
- The left desk mount has only a single arm (currently). It is a WALI arm and is used for a second Neewer LED panel.
Attaching the Camera
Of note is the means by which I attach the camera to the monitor arm and desk mount. I take no credit for this; I got the idea from this YouTube video (the same one linked in the first paragraph). The camera setup has four components:
- The WALI monitor arm (item #2 on the parts list)
- The PULUZ tripod/monopod extension (item #5 on the parts list)
- The Pergear TH3 Pro ball head (item #4 on the parts list)
- The camera quick release screws (a 3/8” quick release screw; part of item #6 on the parts list).
Here’s a picture of the assembled product:
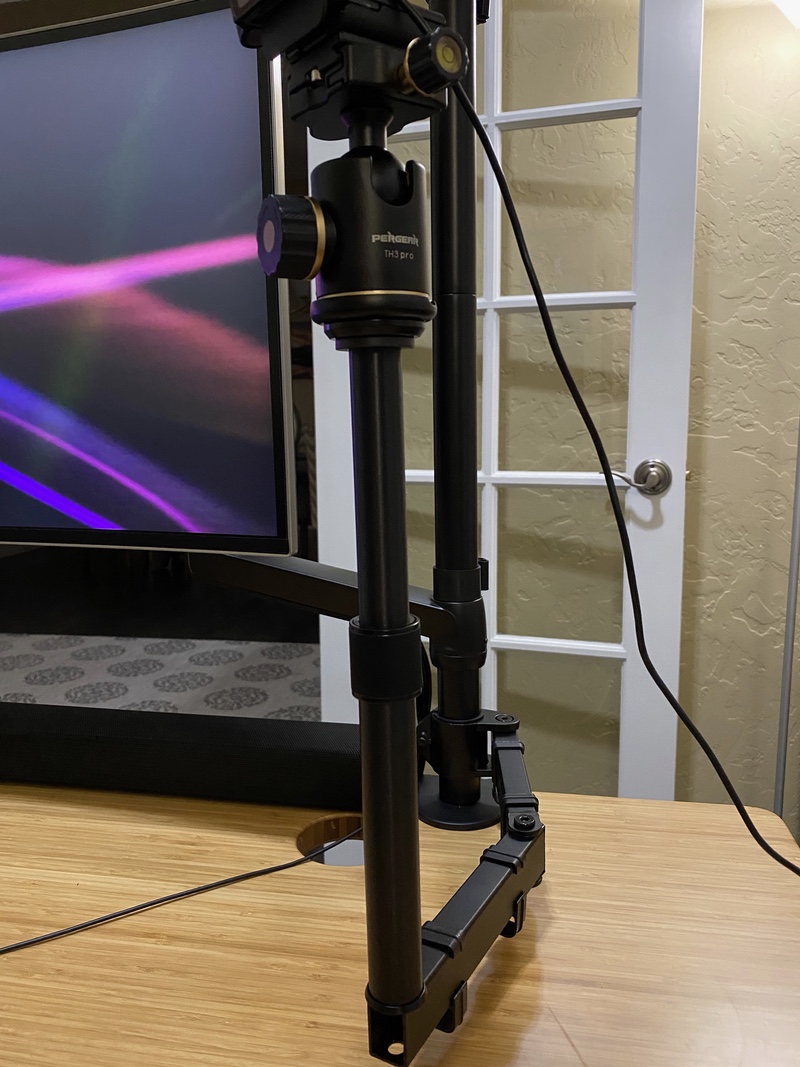
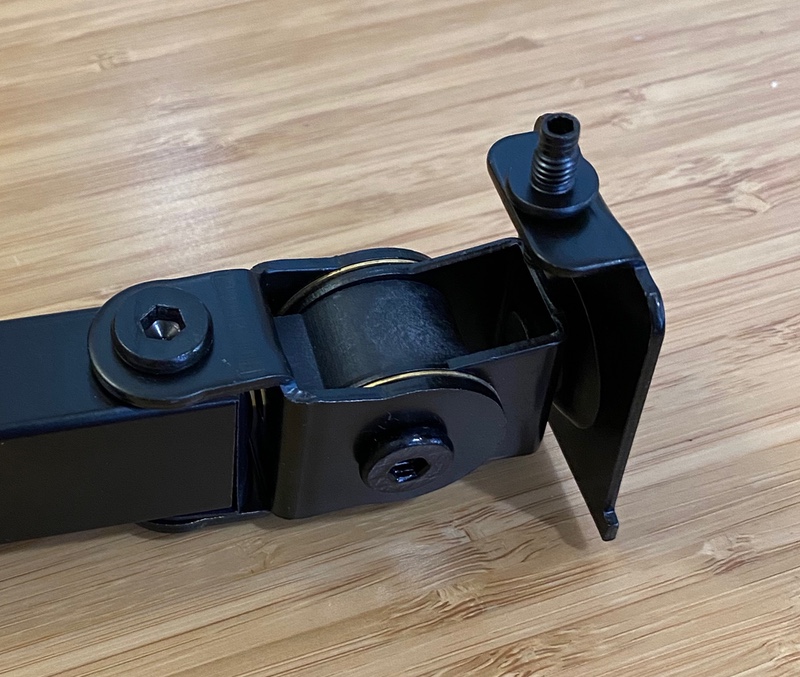
All of this is explained and demonstrated in the YouTube video I’ve referenced a few times, but the assembly goes something like this. First, you’ll need to remove the VESA mount at the end of the monitor arm.
Here’s the with the VESA mount attached (as it comes):
And here’s without the VESA mount:
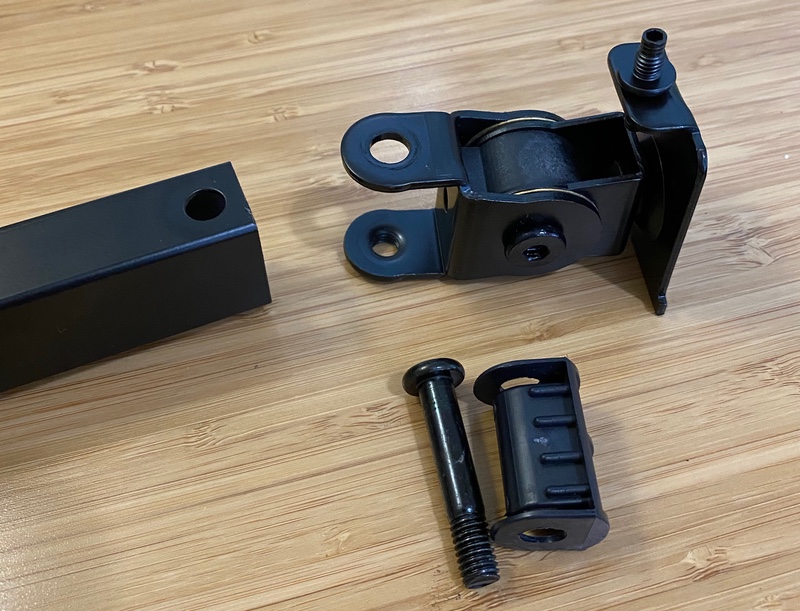
Once the VESA mount is removed, enlarge the top hole in the monitor arm so that one of the 3/8” camera quick release screws will fit through the hole. Using the 3/8” camera quick release screw, attach the tripod/monopod extension, then the Pergear ball head, and then your camera. This gives you the ability to move the camera position (using the arm) as well as adjust the camera height (using the tripod/monopod extension) for perfect placement.
Attaching the LED Panels
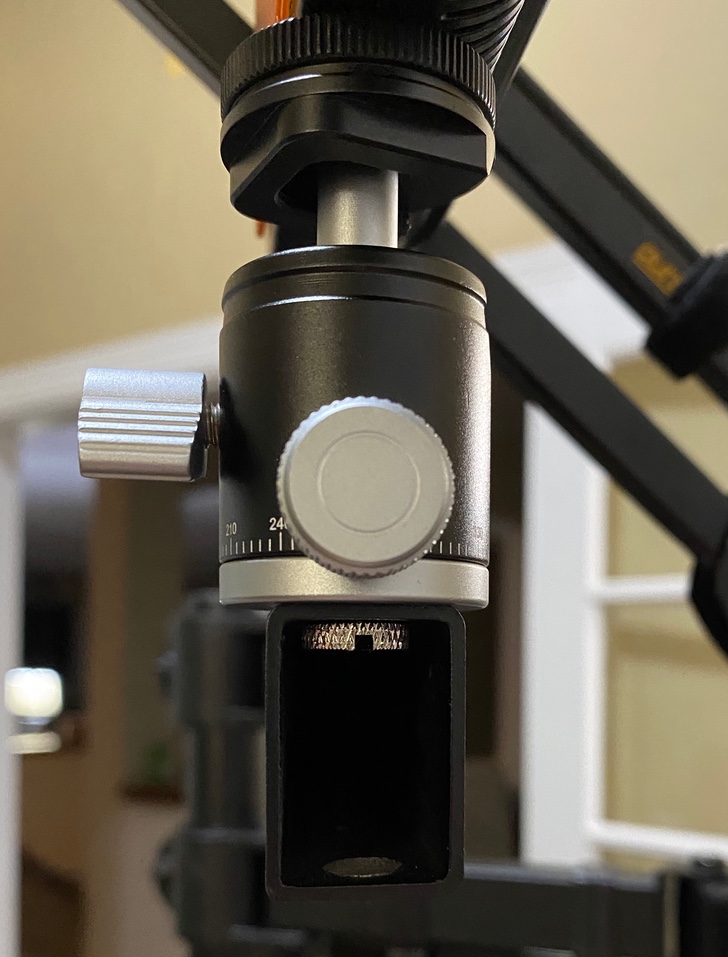
The LED panels are attached in much the same way as the camera. I’m using a lower-end ball head for the LED panels, and they attach using 1/4” quick release screws. Unlike the 3/8” quick release screw used for the tripod/monopod extension, the 1/4” quick release screw will fit through the hole at the end of the monitor arm without any modification. Attaching the LED panels is just a matter of removing the VESA mount, using a 1/4” quick release screw to attach the Pergear TH5 ball head (item #3 on the parts list), and then attaching the LED panel to the ball head.
Here’s a close-up shot of how this looks:
Attaching the Microphone
The microphone is attached using a pretty ordinary two-section boom arm that simply clamps to the end of the monitor arm. All that’s required is to remove the VESA mount, then use the clamp for the boom arm to clamp to the monitor arm. You’ll want a decent microphone that you can (ideally) position out of frame of the camera but that will still produce reasonable sound quality. The linked YouTube video has a recommendation for one (I’m not using that microphone; I’m using a Heil PR40 that was given to me as a gift).
Additional Thoughts
I’m still adjusting things, tweaking the lighting and positioning of the various elements, but I do have a few additional (miscellaneous) thoughts so far:
- The Neewer 160 LED lights aren’t ideal, in my opinion. They are (fairly) inexpensive, but they have drawbacks. Most of the purchasing options don’t include a battery or AC power adapter, which is an additional expense. The color isn’t adjustable, and the light they produce seems fairly harsh even when the brightness is turned way down. Further, I haven’t been able to find any diffusers or shadow boxes that are designed to work with these lights. I’ll probably end up switching to LED panels where both brightness and color are adjustable and that have some means of diffusing the light.
- I’m not pleased with the current microphone boom arm and its attachment to the monitor arm, so I’ll probably look for some sort of alternative in the near future. It just doesn’t feel as sturdy/robust as I’d prefer.
- Upon seeing a picture of the arrangement, several folks have commented on the need for a camera upgrade; that’s in the works. So, even though the current camera arm holds a webcam, I have plans to upgrade that to a DSLR soon. The nice thing about the setup is that swapping the webcam for a DSLR won’t require any changes to the monitor arm, the tripod/monopod extension, or the ball head—it will just be a matter of removing the webcam and replacing it with a DSLR (and adjusting the cabling to account for an HDMI capture device).
- Both the desk mount (vertical poles) and monitor arms come with some cable management pieces; when supplemented with some Velco ties you can easily keep everything neat and organized.
So, there you have it—a fully breakdown of the parts involved, some notes on how everything comes together, and some early thoughts on some of the components. I’d love to hear from other folks who perhaps have done something similar, so feel free to contact me on Twitter and share any feedback on your setup, any thoughts about mine, or just to say hi. Thanks!
![]()


