The previous article looked at how the Web of Trust works in concept, and how the Web of Trust is implemented at Fedora. In this article, you’ll learn how to do it yourself. The power of this system lies in everybody being able to validate the actions of others—if you know how to validate somebody’s work, you’re contributing to the strength of our shared security.
Choosing a project
Remmina is a remote desktop client written in GTK+. It aims to be useful for system administrators and travelers who need to work with lots of remote computers in front of either large monitors or tiny netbooks. In the current age, where many people must work remotely or at least manage remote servers, the security of a program like Remmina is critical. Even if you do not use it yourself, you can contribute to the Web of Trust by checking it for others.
The question is: how do you know that a given version of Remmina is good, and that the original developer—or distribution server—has not been compromised?
For this tutorial, you’ll use Flatpak and the Flathub repository. Flatpak is intentionally well-suited for making verifiable rebuilds, which is one of the tenets of the Web of Trust. It’s easier to work with since it doesn’t require users to download independent development packages. Flatpak also uses techniques to prevent in‑flight tampering, using hashes to validate its read‑only state. As far as the Web of Trust is concerned, Flatpak is the future.
For this guide, you use Remmina, but this guide generally applies to every application you use. It’s also not exclusive to Flatpak, and the general steps also apply to Fedora’s repositories. In fact, if you’re currently reading this article on Debian or Arch, you can still follow the instructions. If you want to follow along using traditional RPM repositories, make sure to check out this article.
Installing and checking
To install Remmina, use the Software Center or run the following from a terminal:
flatpak install flathub org.remmina.Remmina -y
After installation, you’ll find the files in:
/var/lib/flatpak/app/org.remmina.Remmina/current/active/files/
Open a terminal here and find the following directories using ls -la:
total 44
drwxr-xr-x. 2 root root 4096 Jan 1 1970 bin
drwxr-xr-x. 3 root root 4096 Jan 1 1970 etc
drwxr-xr-x. 8 root root 4096 Jan 1 1970 lib
drwxr-xr-x. 2 root root 4096 Jan 1 1970 libexec
-rw-r--r--. 2 root root 18644 Aug 25 14:37 manifest.json
drwxr-xr-x. 2 root root 4096 Jan 1 1970 sbin
drwxr-xr-x. 15 root root 4096 Jan 1 1970 share
Getting the hashes
In the bin directory you will find the main binaries of the application, and in lib you find all dependencies that Remmina uses. Now calculate a hash for ./bin/remmina:
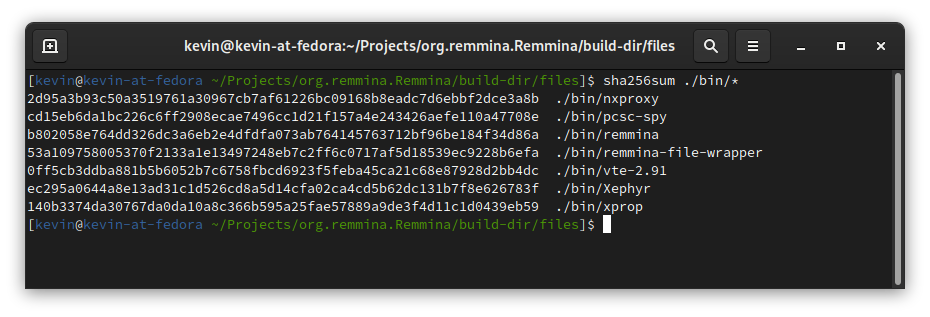
sha256sum ./bin/*
This will give you a list of numbers: checksums. Copy them to a temporary file, as this is the current version of Remmina that Flathub is distributing. These numbers have something special: only an exact copy of Remmina can give you the same numbers. Any change in the code—no matter how minor—will produce different numbers.
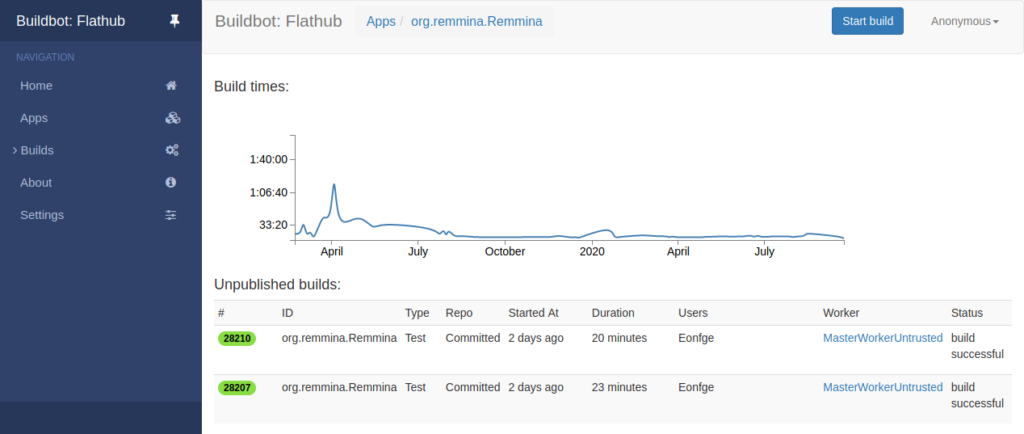
Like Fedora’s Koji and Bodhi build and update services, Flathub has all its build servers in plain view. In the case of Flathub, look at Buildbot to see who is responsible for the official binaries of a package. Here you will find all of the logs, including all the failed builds and their paper trail.

Getting the source
The main Flathub project is hosted on GitHub, where the exact compile instructions (“manifest” in Flatpak terms) are visible for all to see. Open a new terminal in your Home folder. Clone the instructions, and possible submodules, using one command:
git clone --recurse-submodules https://github.com/flathub/org.remmina.Remmina
Developer tools
Start off by installing the Flatpak Builder:
sudo dnf install flatpak-builder
After that, you’ll need to get the right SDK to rebuild Remmina. In the manifest, you’ll find the current SDK is.
"runtime": "org.gnome.Platform", "runtime-version": "3.38", "sdk": "org.gnome.Sdk", "command": "remmina",
This indicates that you need the GNOME SDK, which you can install with:
flatpak install org.gnome.Sdk//3.38
This provides the latest versions of the Free Desktop and GNOME SDK. There are also additional SDK’s for additional options, but those are beyond the scope of this tutorial.
Generating your own hashes
Now that everything is set up, compile your version of Remmina by running:
flatpak-builder build-dir org.remmina.Remmina.json --force-clean
After this, your terminal will print a lot of text, your fans will start spinning, and you’re compiling Remmina. If things do not go so smoothly, refer to the Flatpak Documentation; troubleshooting is beyond the scope of this tutorial.
Once complete, you should have the directory ./build-dir/files/, which should contain the same layout as above. Now the moment of truth: it’s time to generate the hashes for the built project:
sha256sum ./bin/*

You should get exactly the same numbers. This proves that the version on Flathub is indeed the version that the Remmina developers and maintainers intended for you to run. This is great, because this shows that Flathub has not been compromised. The web of trust is strong, and you just made it a bit better.
Going deeper
But what about the ./lib/ directory? And what version of Remmina did you actually compile? This is where the Web of Trust starts to branch. First, you can also double-check the hashes of the ./lib/ directory. Repeat the sha256sum command using a different directory.
But what version of Remmina did you compile? Well, that’s in the Manifest. In the text file you’ll find (usually at the bottom) the git repository and branch that you just used. At the time of this writing, that is:
"type": "git", "url": "https://gitlab.com/Remmina/Remmina.git", "tag": "v1.4.8", "commit": "7ebc497062de66881b71bbe7f54dabfda0129ac2"
Here, you can decide to look at the Remmina code itself:
git clone --recurse-submodules https://gitlab.com/Remmina/Remmina.git cd ./Remmina git checkout tags/v1.4.8
The last two commands are important, since they ensure that you are looking at the right version of Remmina. Make sure you use the corresponding tag of the Manifest file. you can see everything that you just built.
What if…?
The question on some minds is: what if the hashes don’t match? Quoting a famous novel: “Don’t Panic.” There are multiple legitimate reasons as to why the hashes do not match.
It might be that you are not looking at the same version. If you followed this guide to a T, it should give matching results, but minor errors will cause vastly different results. Repeat the process, and ask for help if you’re unsure if you’re making errors. Perhaps Remmina is in the process of updating.
But if that still doesn’t justify the mismatch in hashes, go to the maintainers of Remmina on Flathub and open an issue. Assume good intentions, but you might be onto something that isn’t totally right.
The most obvious upstream issue is that Remmina does not properly support reproducible builds yet. The code of Remmina needs to be written in such a way that repeating the same action twice, gives the same result. For developers, there is an entire guide on how to do that. If this is the case, there should be an issue on the upstream bug-tracker, and if it is not there, make sure that you create one by explaining your steps and the impact.
If all else fails, and you’ve informed upstream about the discrepancies and they to don’t know what is happening, then it’s time to send an email to the Administrators of Flathub and the developer in question.
Conclusion
At this point, you’ve gone through the entire process of validating a single piece of a bigger picture. Here, you can branch off in different directions:
- Try another Flatpak application you like or use regularly
- Try the RPM version of Remmina
- Do a deep dive into the C code of Remmina
- Relax for a day, knowing that the Web of Trust is a collective effort
In the grand scheme of things, we can all carry a small part of responsibility in the Web of Trust. By taking free/libre open source software (FLOSS) concepts and applying them in the real world, you can protect yourself and others. Last but not least, by understanding how the Web of Trust works you can see how FLOSS software provides unique protections.


