Fedora 33 introduced a new default filesystem in desktop variants, Btrfs. After years of Fedora using ext4 on top of Logical Volume Manager (LVM) volumes, this is a big shift. Changing the default file system requires compelling reasons. While Btrfs is an exciting next-generation file system, ext4 on LVM is well established and stable. This guide aims to explore the high-level features of each and make it easier to choose between Btrfs and LVM-ext4.
In summary
The simplest advice is to stick with the defaults. A fresh Fedora 33 install defaults to Btrfs and upgrading a previous Fedora release continues to use whatever was initially installed, typically LVM-ext4. For an existing Fedora user, the cleanest way to get Btrfs is with a fresh install. However, a fresh install is much more disruptive than a simple upgrade. Unless there is a specific need, this disruption could be unnecessary. The Fedora development team carefully considered both defaults, so be confident with either choice.
What about all the other file systems?
There are a large number of file systems for Linux systems. The number explodes after adding in combinations of volume managers, encryption methods, and storage mechanisms . So why focus on Btrfs and LVM-ext4? For the Fedora audience these two setups are likely to be the most common. Ext4 on top of LVM became the default disk layout in Fedora 11, and ext3 on top of LVM came before that.
Now that Btrfs is the default for Fedora 33, the vast majority of existing users will be looking at whether they should stay where they are or make the jump forward. Faced with a fresh Fedora 33 install, experienced Linux users may wonder whether to use this new file system or fall back to what they are familiar with. So out of the wide field of possible storage options, many Fedora users will wonder how to choose between Btrfs and LVM-ext4.
Commonalities
Despite core differences between the two setups, Btrfs and LVM-ext4 actually have a lot in common. Both are mature and well-tested storage technologies. LVM has been in continuous use since the early days of Fedora Core and ext4 became the default in 2009 with Fedora 11. Btrfs merged into the mainline Linux kernel in 2009 and Facebook uses it widely. SUSE Linux Enterprise 12 made it the default in 2014. So there is plenty of production run time there as well.
Both systems do a great job preventing file system corruption due to unexpected power outages, even though the way they accomplish it is different. Supported configurations include single drive setups as well as spanning multiple devices, and both are capable of creating nearly instant snapshots. A variety of tools exist to help manage either system, both with the command line and graphical interfaces. Either solution works equally well on home desktops and on high-end servers.
Advantages of LVM-ext4
The ext4 file system focuses on high-performance and scalability, without a lot of extra frills. It is effective at preventing fragmentation over extended periods of time and provides nice tools for when it does happen. Ext4 is rock solid because it built on the previous ext3 file system, bringing with it all the years of in-system testing and bug fixes.
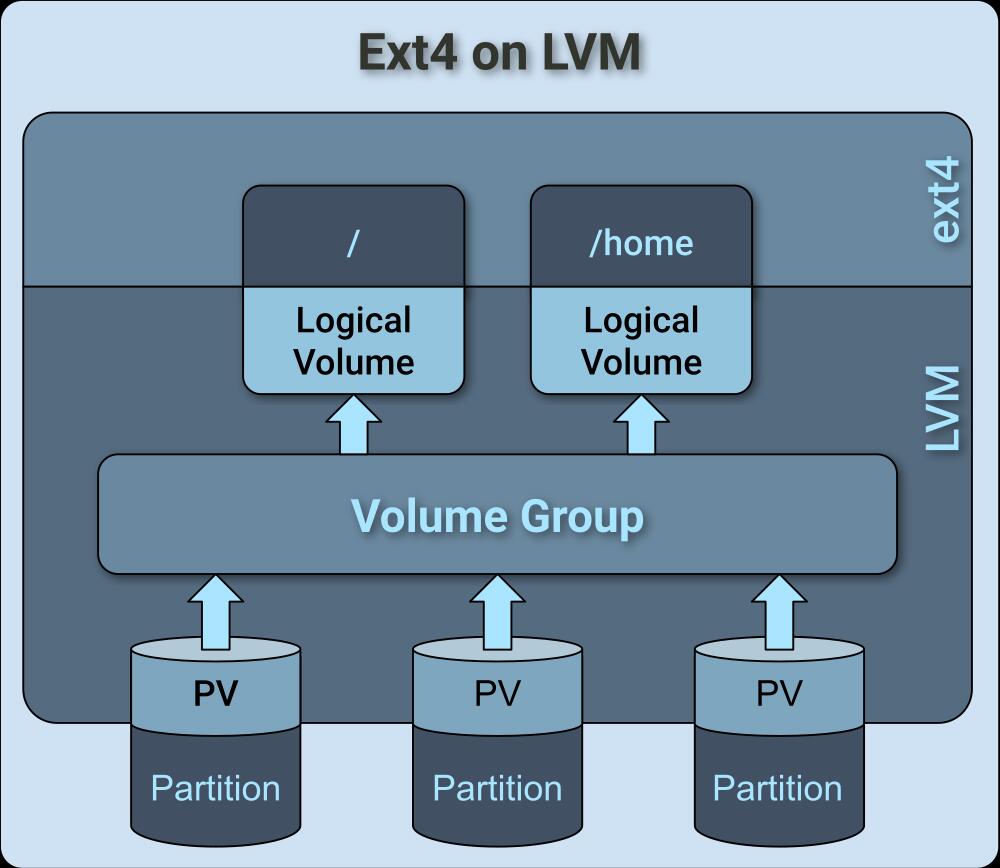
Most of the advanced capabilities in the LVM-ext4 setup come from LVM itself. LVM sits “below” the file system, which means it supports any file system. Logical volumes (LV) are generic block devices so virtual machines can use them directly. This flexibility allows each logical volume to use the right file system, with the right options, for a variety of situations. This layered approach also honors the Unix philosophy of small tools working together.
The volume group (VG) abstraction from the hardware allows LVM to create flexible logical volumes. Each LV pulls from the same storage pool but has its own configuration. Resizing volumes is a lot easier than resizing physical partitions as there are no limitation of ordered placement of the data. LVM physical volumes (PV) can be any number of partitions and can even move between devices while the system is running.
LVM supports read-only and read-write snapshots, which make it easy to create consistent backups from active systems. Each snapshot has a defined size, and a change to the source or snapshot volume use space from there. Alternately, logical volumes can also be part of a thinly provisioned pool. This allows snapshots to automatically use data from a pool instead of consuming fixed sized chunks defined at volume creation.
Multiple devices with LVM
LVM really shines when there are multiple devices. It has native support for most RAID levels and each logical volume can have a different RAID level. LVM will automatically choose appropriate physical devices for the RAID configuration or the user can specify it directly. Basic RAID support includes data striping for performance (RAID0) and mirroring for redundancy (RAID1). Logical volumes can also use advanced setups like RAID5, RAID6, and RAID10. LVM RAID support is mature because under the hood LVM uses the same device-mapper (dm) and multiple-device (md) kernel support used by mdadm.
Logical volumes can also be cached volumes for systems with both fast and slow drives. A classic example is a combination of SSD and spinning-disk drives. Cached volumes use faster drives for more frequently accessed data (or as a write cache), and the slower drive for bulk data.
The large number of stable features in LVM and the reliable performance of ext4 are a testament to how long they have been in use. Of course, with more features comes complexity. It can be challenging to find the right options for the right feature when configuring LVM. For single drive desktop systems, features of LVM like RAID and cache volumes don’t apply. However, logical volumes are more flexible than physical partitions and snapshots are useful. For normal desktop use, the complexity of LVM can also be a barrier to recovering from issues a typical user might encounter.
Advantages of Btrfs
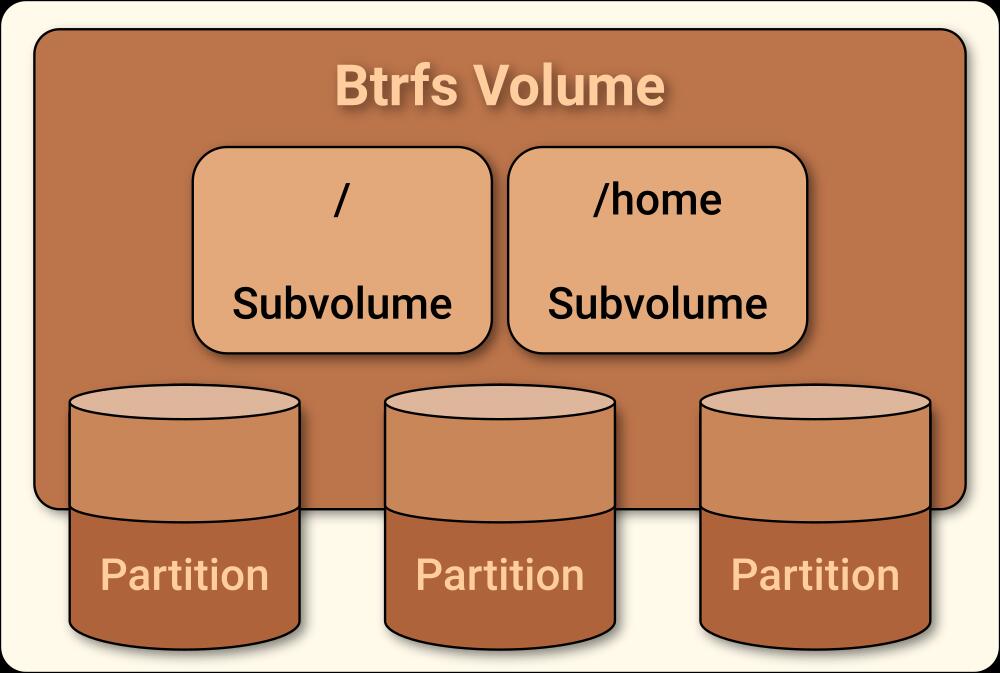
Lessons learned from previous generations guided the features built into Btrfs. Unlike ext4, it can directly span multiple devices, so it brings along features typically found only in volume managers. It also has features that are unique in the Linux file system space (ZFS has a similar feature set, but don’t expect it in the Linux kernel).
Key Btrfs features
Perhaps the most important feature is the checksumming of all data. Checksumming, along with copy-on-write, provides the key method of ensuring file system integrity after unexpected power loss. More uniquely, checksumming can detect errors in the data itself. Silent data corruption, sometimes referred to as bitrot, is more common that most people realize. Without active validation, corruption can end up propagating to all available backups. This leaves the user with no valid copies. By transparently checksumming all data, Btrfs is able to immediately detect any such corruption. Enabling the right dup or raid option allows the file system to transparently fix the corruption as well.
Copy-on-write (COW) is also a fundamental feature of Btrfs, as it is critical in providing file system integrity and instant subvolume snapshots. Snapshots automatically share underlying data when created from common subvolumes. Additionally, after-the-fact deduplication uses the same technology to eliminate identical data blocks. Individual files can use COW features by calling cp with the reflink option. Reflink copies are especially useful for copying large files, such as virtual machine images, that tend to have mostly identical data over time.
Btrfs supports spanning multiple devices with no volume manager required. Multiple device support unlocks data mirroring for redundancy and striping for performance. There is also experimental support for more advanced RAID levels, such as RAID5 and RAID6. Unlike standard RAID setups, the Btrfs raid1 option actually allows an odd number of devices. For example, it can use 3 devices, even if they are are different sizes.
All RAID and dup options are specified at the file system level. As a consequence, individual subvolumes cannot use different options. Note that using the RAID1 option with multiple devices means that all data in the volume is available even if one device fails and the checksum feature maintains the integrity of the data itself. That is beyond what current typical RAID setups can provide.
Additional features
Btrfs also enables quick and easy remote backups. Subvolume snapshots can be sent to a remote system for storage. By leveraging the inherent COW meta-data in the file system, these transfers are efficient by only sending incremental changes from previously sent snapshots. User applications such as snapper make it easy to manage these snapshots.
Additionally, a Btrfs volume can have transparent compression and chattr +c will mark individual files or directories for compression. Not only does compression reduce the space consumed by data, but it helps extend the life of SSDs by reducing the volume of write operations. Compression certainly introduces additional CPU overhead, but a lot of options are available to dial in the right trade-offs.
The integration of file system and volume manager functions by Btrfs means that overall maintenance is simpler than LVM-ext4. Certainly this integration comes with less flexibility, but for most desktop, and even server, setups it is more than sufficient.
Btrfs on LVM
Btrfs can convert an ext3/ext4 file system in place. In-place conversion means no data to copy out and then back in. The data blocks themselves are not even modified. As a result, one option for an existing LVM-ext4 systems is to leave LVM in place and simply convert ext4 over to Btrfs. While doable and supported, there are reasons why this isn’t the best option.
Some of the appeal of Btrfs is the easier management that comes with a file system integrated with a volume manager. By running on top of LVM, there is still some other volume manager in play for any system maintenance. Also, LVM setups typically have multiple fixed sized logical volumes with independent file systems. While Btrfs supports multiple volumes in a given computer, many of the nice features expect a single volume with multiple subvolumes. The user is still stuck manually managing fixed sized LVM volumes if each one has an independent Btrfs volume. Though, the ability to shrink mounted Btrfs filesystems does make working with fixed sized volumes less painful. With online shrink there is no need to boot a live image.
The physical locations of logical volumes must be carefully considered when using the multiple device support of Btrfs. To Btrfs, each LV is a separate physical device and if that is not actually the case, then certain data availability features might make the wrong decision. For example, using raid1 for data typically provides protection if a single drive fails. If the actual logical volumes are on the same physical device, then there is no redundancy.
If there is a strong need for some particular LVM feature, such as raw block devices or cached logical volumes, then running Btrfs on top of LVM makes sense. In this configuration, Btrfs still provides most of its advantages such as checksumming and easy sending of incremental snapshots. While LVM has some operational overhead when used, it is no more so with Btrfs than with any other file system.
Wrap up
When trying to choose between Btrfs and LVM-ext4 there is no single right answer. Each user has unique requirements, and the same user may have different systems with different needs. Take a look at the feature set of each configuration, and decide if there is something compelling about one over the other. If not, there is nothing wrong with sticking with the defaults. There are excellent reasons to choose either setup.


