In March 2011 Apple Inc. proposed RFC 6186 that describes how domain name system service (DNS SRV) records should be used for locating email submission and accessing services. The design presented in the RFC is now supported by Postfix since version 3.8.0. With the new functionality, you can now use DNS SRV records for load distribution and auto-configuration.
What does the DNS SRV record look like
The DNS SRV records were defined in RFC 2782 and are specified in zone files and contain the service name, transport protocol specification, priority, weight, port, and the host that provides the service.
_submission._tcp SRV 5 10 50 bruce.my-domain.com.
| Field | Value | Meaning |
| service name | submission | service is named submission |
| transport protocol specification | tcp | service is using TCP |
| priority | 5 | servers priority is 5 (lower gets tried first) |
| weight | 10 | portion of load the server should handle |
| port | 50 | port where server listens for connections |
| target | bruce.my-domain.com. | name of server providing this service |
Server selection algorithm
Clients should implement the resolution of SRV records as described in RFC 2782. That means, first contact the server with the lowest priority. If the server does not respond, try to contact the next server with either the same or lower priority. If there are multiple servers with the same priority, choose one randomly, but ensure the probability of choosing records conforms to the equation:

where i is the identification of SRV record and k is the count of SRV records with the same priority.
In practice, this means that if you have two servers and one is 3 times as powerful as the other one, then you should give the first weight a value 3 times higher than the other one. This ensures the more powerful server will receive ~75% of client requests and the other one ~25%.
These principles allow SRV records to work as tools to both autoconfigure clients and distribute the workload among servers.
Consider the following example of such a set of records:
_submission._tcp SRV 0 0 2525 server-one
_submission._tcp SRV 1 75 2625 server-two
_submission._tcp SRV 1 25 2625 server-three
Here server-one would always be contacted first. If server-one does not respond, the client will shuffle the two remaining records with priority 1, generate a random number from 0 to 100 and if the running sum of the first record is greater or equal, then try to contact it. Otherwise, the client contacts the servers in reverse order. Note that the client submits the request to the first server it successfully connects to.
Configuration example
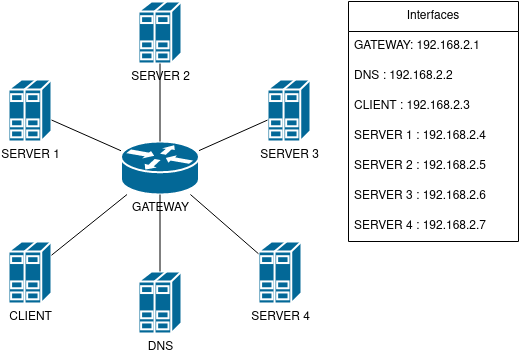
Consider the following situation. You want to configure Postfix to relay outgoing emails through a company mail server by using SRV records for a large number of computers. To achieve this, you can configure the relayhost parameter in Postfix, which acts as a Mail User Agent (MUA) for each computer. If you set the value of the relayhost parameter to $mydomain, your machines start to look up MX records for your domain and attempt to submit mail in the order based on their priorities. While this approach works, you can encounter a problem with load balancing. Postfix uses the server with the highest priority until it becomes unresponsive and only then contacts any secondary servers. Additionally, if your environment uses dynamically assigned ports, you are not able to notify the clients what port is a particular server using. With SRV records, you can address these challenges and keep the servers running smoothly without peaks while changing the server’s port as needed.
Zone file
To configure a DNS server to provide information to clients, see the following example zone file with servers one, two and three configured as relays and server four for receiving test mail.
$TTL 3600
@ IN SOA example-domain.com. root.example-domain.com. ( 1571655122 ; Serial number of zone file 1200 ; Refresh time 180 ; Retry time in case of problem 1209600 ; Expiry time 10800 ) ; Maximum caching time in case of failed lookups
; IN NS ns1 IN A 192.168.2.0
;
ns1	IN A 192.168.2.2
server-one IN A 192.168.2.4
server-two IN A 192.168.2.5
server-three IN A 192.168.2.6
server-four IN A 192.168.2.7
_submission._tcp SRV 0 0 2525 server-one
_submission._tcp SRV 1 50 2625 server-two
_submission._tcp SRV 1 50 2625 server-three
@ MX 0 server-four
Postfix MUA configuration
Configure client machines to look for SRV records:
use_srv_lookup = submission
relayhost = example-domain.com:submission
With this configuration, Postfix instances on your client machines contact the DNS server for the example-domain and request the SRV records for mail submission. In this example, server-one has the highest priority and Postfix tries it first. Postfix then randomly selects one of the two remaining servers to try. The configuration ensures that server one will be contacted first approximately 50% of the time. Note that the weight value in the SRV records does not correspond with the percentage. You can achieve the same goal with the values 1 and 1.
Postfix also has the information that server-one listens on port 2525 and server-two on port 2625. If you are caching retrieved DNS records and you change the SRV records dynamically, it is important to set a low time to live (TTL) for your records.
Complete setup

You can try this configuration with podman and compose file included here:
$ git clone https://github.com/TomasKorbar/srv_article
$ cd srv_article/environment
$ podman-compose up
$ podman exec -it article_client /bin/bash
root@client # ./senddummy.sh
root@client # exit
After completing the configuration steps, you can check the logs to monitor, that the mail passes server one and is delivered to server four.
$ podman stop article_server1
$ podman exec -it article_client /bin/bash
root@client # ./senddummy.sh
root@client # ./senddummy.sh
root@client # ./senddummy.sh
root@client # ./senddummy.sh
root@client # ./senddummy.sh
root@client # ./senddummy.sh
root@client # exit
Now that the first server is down, these six mails will be relayed by either server two or three.
Take a closer look at the Dockerfiles to understand the configuration more deeply.
Finish working with the example by executing: $ podman-compose down


